Concept Art
Creating concept art is a key part to production on my final project as I'm able to plan items before modelling them and see what designs work and what doesn't. To start I created a floorplan of the kitchen I'm going to create

Once the floor plan was completed, I added names to each appliance. Because of how this map is laid out, you can clearly see some obvious zones and areas that can be singled off so that you can only visit them once you have certain materials found. I also decided to add a Walk in fridge and a pantry. Giving 2 more areas to explore.
Items Found In a Kitchen
Starting my idea for this project is obviously going to take some heavy planning to find the right idea. Considering my initial idea is to create a kitchen in which you explore. I'm going to have to research them to give me a better understanding of hospitality. To start with I've created a mind map which implies what you can find within a ordinary kitchen with basic machines and equipment

Within every kitchen you will ALWAYS find key equipment which is crucial to cooking. Such as knives pans and pots. To further show what I may need to create in the future, this mind map shows as a kind of plan which I can keep referring to so that I don't miss any items to place around my level
On the Food and Drink section, I kept it very generic, meaning I stated "Bottle" or "Can" so that I can explore what drink I choose to create. Even with meat, kitchens have many types of meat. So it all depends on the storage areas i create so that contextually makes sense in a kitchen.

To keep myself organised, for now I have created a small asset list to maker sure I stay on track. It may get updated but for now its a small reminder for what I need to make and design
Early Concept Art


This is my first concept for the sink area for the kitchen, as my floor plan shows, the sinks and the fridges are next to each other, this is also only a concept. So I might eventually change the design of the sinks to make it more dangerous for the player. This also means I'm going to texture it in substance painter.


After looking at a ton of real life images of deep fat fryers from multiple food chains and restaurants I took pieces from them all and made my own. It may look generic, but instead of having a massive vent on the top, I've added space for one potentially and added a space about the fryers that could be used for lights. When I do go to model a fryer, I may not use this as a reference because at the moment, I'm not sure if it fits the theme of what I'm going for. The only way to know is to have it made and textured


This is my initial design for a table that I can place around the kitchen, so that I can potentially place pots, pans and other items to make the kitchen easier to explore for the player. Considering this is a simple design, I might end up changing it later, as something doesn't look right about it. Even though this asset may be used a lot, there isn't many ways you can me it detailed without adding things to the shelves.


Since I decided I was going to do a walk in fridge as well as a pantry, I drew a 2 sizes of shelves that I may place in both rooms. Even though they are mainly designed for a walk in fridge. Its a simple design that doesn't need much depth, yet once I do model it and export it into Substance Painter, that's when its really going to stand out. Although this is a concept, I'm already very happy with the design and I'm going to be using it straight away
3D Modelling
To start planning my game, I need to start creating concept weapons and environments. After doing research on weapons that could be available. A spear is the first thing im going to model. As I can potentially stick to that theme when creating other assets.
Spear
My initial concept for a Spear consists of using items found throughout the map. For example, for the Spear a toothpick is the best thing to use that's small and sharp that can be found in a kitchen.

It may not be much, but its the base for a lot of crafting in this game as its sharpness becomes very valuable. To make this, I started with making 2 cones that I made as tall and thin as possible to where you can still see the point. Connecting them was easy, I just added a thin cylinder between both cones.
Kitchen Fryer
Starting with all of the machines within the kitchen, a fryer is going to be used in my kitchen level. Clearly im now going to have to model one. The key to a model like this is the texturing. Meaning I'm going to experiment with Substance Painter

To start this fryer off strong, I created a simple spline of the back part of the fryer to extrude. Giving me the shape I'm looking for with a minimum amount of effort. Then, I used the Boolean tool to create a hole in the top of my shape so that I could create a vent. As you can also see, at the top of the vent the grey rectangle is going to be used for light in the future.

The next step was to add the holes in the fryer so that I can add frying baskets later on. To do this, I used Boolean to create the holes. Then added a base around the side to add some more depth. The back of the fryer is actually a tad further in than being straight at the back. So I added a outline around the outside to make it stand out.
Adding draws was next, I decided that I didn't actually have to interact with these draws, meaning that I could just create a closed door for the front that only needs to be textured. Nearer the top, these are where the screens are gonna be placed to control the fryer, I haven't decided if these are actually going to be interactable.


Giving this model depth has proven to be a very difficult due to the model mainly being made out of squares, to help with that, I used bevel on a couple of the sides so that it looks a lot more detailed. Adding the screens was very easy. But making sure it doesn't look basic and boring was combatted by adding small screws around it.
Because the whole model is completely grey up till this point due to me using Substance Painter eventually, to be able to identify what kind of colours I want to use, I changed a couple of the colours around the machine and added a rack to place the frying basket. As well as that, there is now pieces of scrap attached to each side of the machine.


The back of the Fryer looked extremely empty, it was basic and had nothing added to it. So I also bevelled the backside and made a control panel that was broken. Sticking to the aesthetic of a worn down and abandoned kitchen.
This is the first time that I'm attempting to use Substance Painter. From the start, all of my problems have been instantly solved. The textures are extremely
realistic and within 5 minutes I had found the perfect default texture for the Fryer. The shadows are also very visible. Giving the model a lot more depth when looking at it from certain angles


I simply created a fryer basket in 3DS max with minimal effort then exported it straight into substance. As this model only requires one texture, It was extremely easy to do. That's another simple asset created.
Kitchen Stove

Kitchen stoves are a key part to any kitchen. making it one of the first assets i should make. I began with the doors, they are very straight forward. But getting the proportions right will be the main task. Then I created the switches, using the bevel tool on a small cylinder. On the top of the hob, my idea is to make a half grill half hob setup. Mirroring a more modern stove.
I moved the top part of my fryer asset across to make sure that both machines line up and can be potentially next to each other. This also gave me space to create a space for a grill, as well as make everything look a bit more realistic


After messing around with a ton of textures, the model looked decent, but something just wasnt right. After many times looking at it, I figured out the problem. There wasnt a grid around the actual stoves, meaning that the model was missing a key detail. I hopped back onto 3DS Max and added the grid.
Once the previously mentioned grid had been made, I put the model back into Substance Painter to finish the texturing. I felt that the previously used textures didnt actually fit the right scheme as the Fryer. Causing the 2 not to match. So I used the textures I had used on the Fryer on this model. It now looks extremely good

Microwave

Modelling a microwave is one of the easiest things. Due to it being 99% squares. So to make it not seem to boring, I extruded and bevelled the sides. When I now go to texture it, It will show more shadows.
Finally I added the keypad to control it. My idea is that you start the level inside the microwave and venture out into the kitchen


After importing my model into Substance Painter so that I could texture it a lot better, I instantly found the right materials to use and added a "Dirt" modifier to make the microwave look extremely dirty and abandoned. Making it a perfect fit for my kitchen. To make it seem so much more damage, on both sides I added scratch marks so that when the player is close up to it due to their size, it will have more detail.
Sink

The base for this sink is pretty straight forward. Simple cylinders and boxes were used to make the simple shape. Adding details wont be that hard either as these sinks arent detailed at all. Other than a on switch there is nothing really to add around it.
As stated before, there isn't much to add to give more detail as everything is very simple and doesn't need much effort. To create the tap, I created a spline the right shape that I wanted then used the "Sweep" modifier to create a pipe that can be used


The taps are a hard thing to do as they require you to make a shape that you cant get naturally. So to get the shape I turned a already beveled cylinder and then created a editable poly that I eventually moved the edges a certain way to give a more detailed effect. The plug was very easy. Just using bevel and adding a spline that I created and using "Sweep" on it to create a pipe.
The switches are also made using the same technique
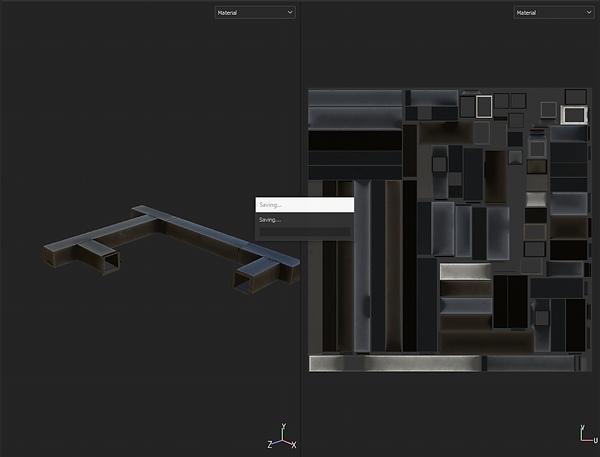
Once my model was complete, I exported it into substance painter so that I could begin to texture it. Finding the right balance so that it matches with my other models was hard. As lighting is a huge factor.
This was my first attempt at texturing the sink


The second attempt of texturing this sink went a lot better. Once I moved the lighting so that I could see it from a better angle and I baked it to let me see the model at its best. I also used the textures from my other models to make them match. Overall I think it looks extremely good.
Kitchen Side

Making a kitchen side is very easy, it is only cylinders and rectangles, I had to compared the height and the width of these appliances to the sides so that the player cant see that they are different. Making their gaming experience better.
All I need to do to this model is texture it using Substance.
After adding chrome blue like I did for each other asset I have created to make them all fit together, It was extremely easy to add a dirt texture which make the entire surface that looks extremely good. I may need to add it to some of my other assets to make them all on the same theme

Pizza Oven

It may not be in my current floor plan, but i felt this restaurant really needed a pizza oven to fill in some of the empty space.
I'm going to make it 3 layers high, to speed up the process, I can easily duplicate the layer and stack them all on top of each other. To create the handle on the machine, I just used the sweep modifier on a already edited spline
Now every layer is on the top, the shape is really working. But originally stacking them, the gap between each door was way too small. Meaning practically they wouldn't be able to open. So to combat that I just added a couple of rectangles between the layers. It now looks alot better


After messing about with many different textures to make this oven the most realistic as possible, I realizes that matte black was the perfect color to contrast the rest of the machine and make it stand out. Also by adding those layers in between each oven, you can really see more depth on the side of the machine. With the mesh baked, the shadows look extremely good.
Making Tools and Cutlery.
Now all my chosen appliances have been modelled, I need to start creating smaller assets that are used in a kitchen, such as Pots, Pans and things like Ladles and Spatulas.
Pots and Pans

Frying pans are one of the most useful assets in a kitchen. Used for making many things such as stir-fry's and searing steaks or fish. That's why is the first thing that I've modelled when it comes to pots and pans.
The basis for a model like this starts with a simple cylinder, I converted it into a editable poly and moved the edges to make a sort of "Bowl" but I squashed it down to make it seem as close to a frying pan as possible. The handle was by far the easiest bit. To stop it from looking like a bowl, I added a small base to the pan to make it more cylindrical
Like mentioned before, the pots being part of a set is very good for me, making everything so much easier, the only thing that I have to now do is find the correct color scheme and design so that I can match it to every other pot and pan. For example went with this matching set of "Copper" and "Copper Wire" so that I can math it with the texture called "Bronze Armor". Overall making a very detailed looking pot after baking the mesh at 2k pixels.


Because of most pots and pan sets following the same design and colors, I simply just grabbed each top edge from the previous pan then extruded it upwards so that the inside actually became detailed by at the same time, creating a different type of pan.
Size of the pans can also be a different variable, so to make my life a lot easier and making this process a lot more efficient, I'm going to keep doing this process but actually shrink the asset to complete the set.
The next item to texture is a bigger pan, the same thing was done to this asset than the other one, merging copper wire and different copper textures so some how get a burnt and old looking bottom to the pan that looks extremely good. The handle being "Bronze Armor" makes it really stand out as the handles of normal pans are normally not matching the rest of the pan.


You wouldn't class this asset as a pan or a pot, its in between. These pots are the the start of the range that allows you to create sauces or stocks. May even cooking fish or meat with vegetables. All I need now to add to these assets are the lids. That I will eventually model. The handle hasn't changed mainly due to the fact that this is one set and that it wont suit very well with many different types of handles.
This pot actually came out different originally when texturing it, I think its because of its depth but the bronzes came out a little different when looking at it. So to help with this I looked through some of the texture options to make it seem as close to the set as possible. That's when I stumbled across the "Dust" texture. It attaches itself to the texture and doesn't change the color but gives it a dust effect.


Making actual pots are a lot easier than I thought, By raising the edges like I did for the other pots and pans I have made, I can just remove the handle but then create 2 more to place on the outside so that they can be held with both hands. Again I'm able to make smaller versions of these pots that can fit inside each other so that storage on the actual map can be freed if needed
Because of my experimentation with the last pot, I used the newly found technique of adding dust to the pot. As you can see around the outside of the pot, its actually created a effect where you can see wear of previous use around it from sauces and broths bubbling up. Which really wasn't my intention. But it worked out for better, from up close in the players POV I think its going to look extremely good.

Unreal Experimentation
This is the start of me experimenting with unreal


It took a while to figure out how to import these textures into unreal properly. In the first photo you can see the final imported model. This took a lot of tweaking as the shadows and shininess of the textures. To help with this I added a multiple so that I could make the colour a lot more matte. The results are very good and fit exactly what I want it to look like
Your character may be small b7ut they aren't super small so that you can see the smallest organisms, that's why I need to find the perfect size and perspective for the player so that they can actually see the environment properly.
After some brief experimentation, I found the perfect scale or the player. What makes this size perfect is that you now need to be able to crouch under some appliances, meaning I'm going to have to create a crouching mechanic.

After adding the side and the previously made stove, I think I got the proportions right. Meaning If I jumped across all 3 appliances It would be relatively simple. Making my life so much easier when it comes to importing the other assets.
The sink was a good edition to add now as that allows me to see how this side matches with the other sides im going to eventually add

These are all of the assets lined up, now they are all in the level, I can actually start to create the map that I planned out. Starting with the main kitchen area.


From a top down view you can really see that my map is starting to match up to my original design, yet I can see that there is way more space around the kitchen now. That can either be a good or a bad thing. That means I need to fil the space a lot more. But there isn't many items that can fill it. Such as cardboard boxes.

I created a couple of walls that I ended up texturing in substance painter, only a plain grey so that I can add some lights later for more effect. This level is really starting to take shape.

I felt like this map needed something out of the ordinary, such as a interesting movement mechanic or a secret. Then I thought of the idea to create a vent that allows you to get from one height to another but outsider of the map. I started with some normal rectangles that I booleaned a hole into the middle of. Then added a thin square so that it has sopme sort of texture and isn't just a blank box.

Once I had all of my parts made all I had to do with assemble them, so I lined up the vent to the top down view so that it matches and I ca effectively add holes to the right place ands scale. By adding 2 dead ends I might be able to place a secret or a item there for the player to find if they happen to take that wrong turn.
In the end I was happy with my design and moved onto texturing it in substance, it was relatively easy as all I had to do was find one texture or colour that I like and apply it to the whole thing, this black is really good as it looks good on the inside, the only part the player will be able to see.

My first thought was fitting this was going to be easy, just because I was confident that I had created the right size vent, but i was wrong, the size was a tad off, leading me to move the places tables a little bit further across to make sure that it lines up correctly for the players to climb across it. All I need to do now is add holes in the walls, but that may be a challenge to do as these walls are made in 3DS Max not Unreal Engine.
Problem - When trying to create holes in the walls for the vents to fit, I encountered a problem that took a while to fix. I couldn't create a hole in the wall in unreal so I created a wall separate to my original then added some holes to allow my vent to slip into it easily

This proved to be a bigger problem than I thought. I was able to create some holes in the walls by made a box brush and subtracting some boxes into it. Then to make sure it stayed I turned it into a static mesh afterwards. All I needed to do was add a texture to match the rest of the walls. To do this I exported the wall as a FBX file to re texture in substance.

I moved this other wall into 3DS Max to texture to make sure that it would import correctly then I placed it into substance to add the same texture I did for the other walls. Mainly to make surer that they all match. As well as adding greenery to it. All I need to do is actually put it into unreal

Now the walls are in this map is actually starting to come together, I just need to fill a lot of the space around the area especially the floors. Because that can take away from the player experience if you literally have nothing around you to look at or walk around. As well as parkouring around the map


A shelf was really needed to make sure that I filled as much space as possible, also allowing the player to climb around the map with ease. This was extremely simple as this model is all cylinders. Then I applied 2 textures in substance.

After implementing my shelf, I needed to start filling it up with items I had previously made such as pots and pans. This also forced me to make some lids to add to the shelves to fill as much space as possible on one layer. Due to how out of place they all look. It looks a lot more messy and realistic

This is one half of the room pretty much complete, I have also thought about the way the player is going to move across the map by jumping across certain parts of the shelves. As well as filling them up so that I may be able to hide items behind them. Overall though, Im starting to get a proper vision on how this room is going to look.

Because of the previous shelves that I made, It looked like I needed a bit of variety, then I realized that I hadn't made any shelves that could go on the wall for jars and other items like that. Making this a very easy item to make as it only used 3 rectangles


A toasty maker was next on my list and was relatively easy to make, Although getting the right proportions is the key to a item like this as contextually it must be able to close, so I made sure that the dimensions matched on both halves to allow me to change the pivot point and let it open realistically


Part of my research into movement and ways that you will be able to adventure around a kitchen, a mop bucket became a very good idea due to the player being able to jump into water from certain heights to deduct all fall damage from them. The hardest aspect of creating this asset had to be the filter. Making sure that it was all even was very difficult. Texturing on the other hand was extremely easy as I found the perfect texture that matched the entire bucket to how I wanted it to look

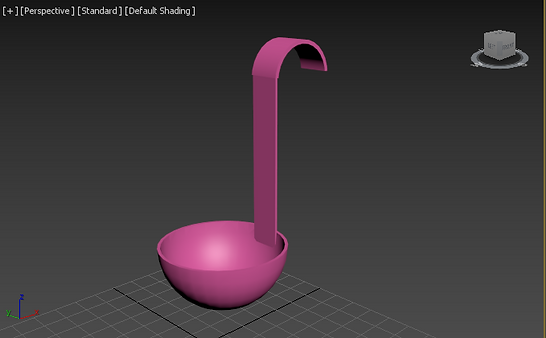
For chefs to be able to cook they need many different pieces of equipment so aid them when it comes to frying and stirring. That's when I realized I forgot about Ladles and other items along that line. So I got to work with the ladle to start with. Then I'm going to move onto a spatula.


The spatulas were extremely easy to make as I was able to Boolean some holes into one of them and the other I kept bare so that I could have more variety when adding these models into Unreal


to fill in a lot of the space of my kitchen I needed to make some sort of blender so that the player has some sort of danger when exploring the area. This was extremely easy as it only required me to use only a couple of cubes and rectangles.
The next step wads to import into sub stance painter and texture it properly. When adding more depth I added some leaves and greenery around it to so that it looked more warn out

Organisation is the key part of this project as I need to make sure that all of my assets are done in time. So to help with this i created a asset list on what I need to complete. Most of these I have completed and have checked them off. But I still have a ton to do.

I was having a hard time finding some variety when it came to the layout of my map. So I did a test room off the side to split the room up a bit and it really seems to break up the room plus use the space I was struggling to fill.


As previously mentioned I needed to create some space on my map by adding a difference type of door. Or a extra room, that I could make it so the player is un able to enter it but can see only just through it. Giving me a lot less to do when I fill the room even more

I know this rack may seem pointless in the grand scheme of things, but it allows the player more movement around the kitchen. As well as adding context to how this kitchen operates

This room needed some smaller items to scatter all over the place so that the player can move around the mess. So I firstly made a can and textured it in substance.


My level needed a lot more colour to switch up a little bit. Since I added the yellow sign it actually made the level look alot more fresh. So adding some damaged orange will stand out a lot more as kitchens do need containers.

This level is starting to come together, everything being random is starting to really bring it all together. Now all I need to do is add a ton of mess to the floor as that was recommended to me through my play testing,